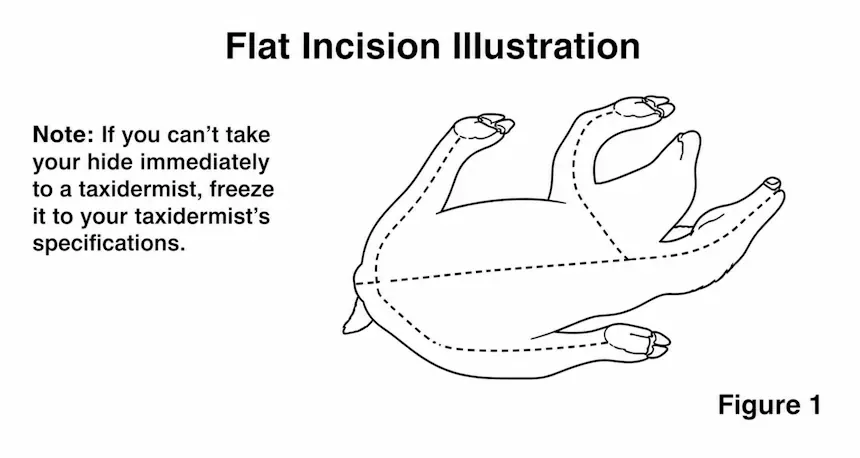
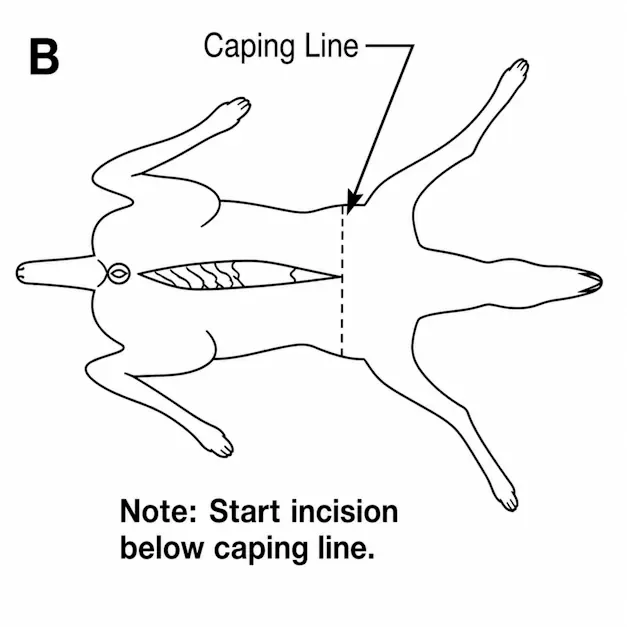
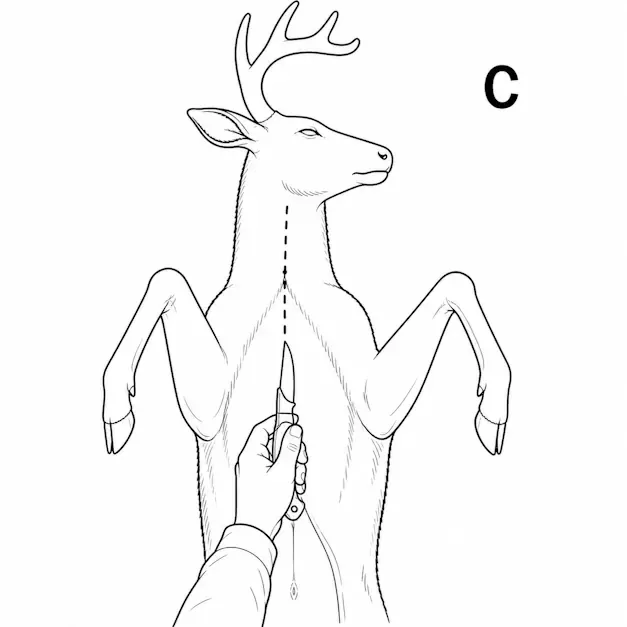
Skip to content
The Hunter’s Taxidermy
Field Care

A quality mount begins with proper field care.

What you do in the first hour after the shot decides what’s possible at the bench. Read the full guide below or download the printable manual for the field.

Download Printable PDF
Why It Matters

The first hours decide everything.

Many trophies are ruined in the first few hours after death. As soon as the animal dies, bacteria begins to attack the carcass. Warm, humid weather accelerates bacteria growth. In remote areas, or areas not near your taxidermist, a competent person may be required to cape out the hide in order to preserve it.

Damage to a trophy is costly to repair. Some types of damage simply can not be “fixed” by the taxidermist. Every taxidermist has a preferred method of caping a hide - contact us prior to your hunt for instructions on our caping requirements. The techniques below are generally acceptable.

Step One

Field dressing.

  1. With deer on its back make a shallow cut through the skin just below the breastbone. Make sure that you start your cut well away from the brisket allowing plenty of uncut skin for your shoulder mount. Insert two fingers of the free hand, cradling the blade, to hold the skin up and away from the entrails (Figure A).

    Figure A — field dressing illustration
    Figure A
  2. Cut straight down the belly and around the genitals, separating but not severing them from the abdominal wall. Slit the belly skin all the way to pelvic bone (Figure B).

    Figure B — field dressing illustration
    Figure B
  3. Cut deeply around the rectum, being careful not to cut off or puncture the intestine. Pull to make sure the rectum is separated from tissue connecting it to the pelvic canal. Pull the rectum out and tie string tightly around it to prevent droppings from touching the meat. Lift the animal’s back quarter up a bit, reach into the pelvic canal, and pull the intestine and connected rectum into the stomach area.

  4. If you want to make a full shoulder mount, do not cut open the chest cavity. Cut the diaphragm away from the ribs all the way to the backbone area. Reach into the forward chest cavity, find the esophagus and windpipe, cut them off as far as possible (Figure C), and pull them down through the chest.

    Figure C — field dressing illustration
    Figure C
  5. Roll the deer onto its side, grab the esophagus with one hand and the rectum/intestine with the other. Pull hard. The deer’s internal organs will come out in one big package with a minimum of mess.

Note

Start your incision below the caping line. Caping itself is best left to the taxidermist - their experience with the delicate nose, mouth, eyes, and ears is invaluable toward producing a quality mount.

Life-Size Big Game

Two methods of skinning.

For a large life-size mount such as deer, elk, or bear, there are two major methods of skinning: the flat incision and the dorsal method.

The Flat Incision

The flat incision is used for rug mounts and for a variety of poses. The areas to be cut are shown in Figure 1. Make these slits (cutting the feet free from the carcass) and pull the skin off the carcass. The head is detached as with the shoulder mount.

Figure 1 — flat incision illustration
Figure 1

The Dorsal Method

The dorsal method involves a long slit down the back, from the tail base up into the neck. The carcass is skinned as it is pulled through this incision. The feet/hooves and the head are cut off from the carcass as with a shoulder mount. Only use this method with approval and detailed instruction from your taxidermist, and only when the skin can be frozen quickly after skinning.

If You Can’t Get to a Taxidermist

Freeze the hide to your taxidermist’s specifications. Call ahead so we can walk you through it for your specific animal.

Shoulder Mount

Caping for a shoulder mount.

  1. With a sharp knife slit the hide circling the body behind the shoulder at approximately the mid-way point of the rib cage behind the front legs. Slit the skin around the legs just above the knees. An additional slit will be needed from the back of the leg and joining the body cut behind the legs (Figure 2A and 2B).
  2. Peel the skin forward up to the ears and jaw exposing the head/neck junction. Cut into the neck approximately three inches down from this junction (Figure 3). Circle the neck cutting down to the spinal column. After this cut is complete, grasp the antler bases and twist the head off the neck. This should allow the hide to be rolled up and put in a freezer until transported to the taxidermist. These cuts should allow ample hide for the taxidermist to work with in mounting. Remember, the taxidermist can cut off excess hide but he can’t add what he doesn’t have.
Figures 2A, 2B & 3 — caping for a shoulder mount
Figures 2A, 2B & 3

Handling Tips

When field dressing a trophy to be mounted, don’t cut into the brisket (chest) or neck area. If blood gets on the hide, wash it off with snow or water as soon as possible.

Avoid dragging the deer out of the woods with a rope. Place it on a sled, rickshaw, or 4-wheeler. Rope, rocks, or a broken branch from a deadfall can easily damage the fur or puncture the hide. If you must drag with a rope, attach it to the base of the antlers and drag carefully.

Other Game

Mammals, birds, and fish.

Small Mammals

Animals, coyote sized or smaller, should not be skinned unless by a professional. Don’t gut the animal. Small mammals, especially carnivores, will spoil quickly because of their thin hide and bacteria. If you can’t take the small game animal immediately to a taxidermist, as soon as the carcass cools completely, put it in a plastic bag and freeze it.

With the epidemic of rabies evident in many areas of the country, take every safety measure necessary when handling your game.

Birds

Do not gut the bird. Rinse off any blood on the feathers with water. Take the bird immediately to your taxidermist or freeze it. Put the bird into a plastic bag for freezing being careful not to damage the feathers, including the tail. If the bird’s tail feathers do not fit in the bag do not bend them. Let the tail stick out of the bag and tie the bag loosely.

Fish

Do not gut your fish. If you can not take your fish immediately to a taxidermist, wrap it in a very wet towel and put it in a plastic bag, making sure all the fins are flat against the fish’s body (to prevent breakage), and freeze it. A fish frozen with this method can safely be kept in the freezer for months.

A fish will lose its coloration shortly after being caught. A good color photograph immediately after the catch may enable the taxidermist to duplicate the natural color tones of that particular fish.

Tips

Tags, permits, and remote hunts.

  • Always have appropriate tags with your trophies when you take them to your taxidermist.
  • Do not cut the ears for attachment.
  • Songbirds, eagles, hawks, and owls are protected by Federal Law and can not be mounted unless with special Federal permit.
  • For situations where you are hunting with no available taxidermist or freezer, ask us about techniques to skin out the entire cape (including the head) and salting the hide. This is the only method in remote locations that can preserve your hide for later mounting.

A note on safety.

Because of the various diseases that wild game can transmit to humans, always use extreme caution when handling the carcass. Use rubber or latex gloves and thoroughly wash your hands with soap and water after handling.

Have an animal in the field?

Call John Louw before you cut anything you’re unsure about - a two-minute conversation can save a once-in-a-lifetime trophy.